The AML Compliance Tab
Initially, every entity your firm manages will appear in the ‘Undergoing CDD’ subsection on the ‘AML Compliance’ tab.
After completing the AML Workflow, the entity will be moved to the ‘Completed CDD’ tab.
You can apply filters to the workflow in the left-hand column, to view the clients' list by:
-
Reason for CDD
-
Scheduled to complete
-
Review status
-
Level of CDD
-
Level of risk
-
Client type
-
Business unit
-
Partner
-
Manager
- Subscription
Within the ‘Undergoing CDD’ page of the AML Compliance tab, search for, then click on the name of the entity you would like to perform a CDD check on. A slide-out form will appear which provides the information you need to capture, based on the legislation and DIA guidelines.
1. CDD Workflow Step: Level of CDD

1. Recommended, scheduling a due date for the completion of CDD.
2. Under the Nature of business relationship select all appropriate options for this entity.
At the bottom of this page, you also have the option to enter additional notes and attach any supporting documents, such as an internal checklist or terms of engagement to which the client has agreed to.
3. The last step on this page is to select the Level of CDD to perform. Based on the outcome of your risk assessment you can select from Simplified, Standard or Enhanced.
Note - Trusts will always require Enhanced CDD so this option will be selected by default.
4. Once you have filled out all the details on this page, click Update.
2. CDD Workflow Step: Client Information

1. Most fields in this subsection will already be filled via the information provided by the Companies Office, or previously recorded within the entity's workspace profile.
It is recommended to select the tick box Copy information from the profile
There is a legal requirement to enter a company's trading name if it differs from the legal entity name.
2. At the bottom of this page, you also have the option to enter additional notes and attach any supporting documents.
3. Once you have checked all the information is correct and made any amendments, select the tick box at the bottom of the page "This section has been completed", and click Update.
3. CDD Workflow Step: CDD Candidates

1. A list of the parties associated with the client will appear here.
2. Next, to the names of the people/entities you would like to include in the entity's CDD, select the AML-relevant relationship. Relationships that can be selected are:
-
Authority to act
-
Effective control
-
Transactions conducted on behalf
-
>25% ownership (Companies only)
-
Other control
Where the client is an individual subscription, the individual is automatically selected as a CDD Candidate (flagged as ‘Client’) and cannot be removed. Additionally, more than one relationship can be selected per candidate.
NB. If candidates are missing from the list of CDD candidates, you will have to navigate back to the entity's workspace to add in the required individuals.
Important
If more than one copy of an individual appears in the list return to your Clients>Contacts tab, search for the person and Merge Duplicate Contacts before proceeding with the next step.
Just to let you know, for Companies, unless you have manually updated the share register held in Connectworks, it will only display the share register as it was recorded with the Companies Office on the day of import. If the share register is up to date and you have identified parties with effective control/beneficial ownership then these individuals will pre-populate as requiring CDD.
3. As you add candidates they will form a list that displays their roles within the entity and the reason for performing CDD.
4. When you are satisfied that the correct people appear in this list, select the tick box at the bottom of the page "This section has been completed", and click Update.
Note: As you progress through the steps you will notice that ticks begin to accumulate next to each section. This will only occur when it has been marked as complete. If you want to come back to complete a section later simply update in the top right without selecting "This section has been completed". The section will remain un-ticked until updated.
Related Article: If one of your CDD candidates is another entity (ie. a Company, Trust, Partnership or other) you may wish to also review our article Completing CDD across complicated ownership structures.
4. CDD Workflow Step: Perform CDD

1. A list of the CDD candidates will appear displaying the ID verification information that was added against the individuals in the first step Adding evidence and making a determination, of their AML/CFT relationships to the entity and source of funds.
If the above step is not done, you could be replicating work that has been done on the client previously.
-
Identity verification - collect and verify name D.O.B. and address of candidate (Name, NZBN and registered address for non-natural candidates)
-
AML/CFT relationships - Record and provide evidence of Beneficial ownership and confirm the authority to act on behalf of the client.
-
PEP and Personal source of wealth - Determine whether the candidate is politically exposed and provide evidence of the source of funds for the candidate if required. (PEP is non-applicable for a non-natural entity)
Select ‘Update’ next to each of the above-mentioned sections to add information (or “collect and verify” for the identity verification section)
2. If the evidence from a prior determination displayed is correct you can select "Use this".
3. If a person's information needs updating or does not have an ID determination appearing, select "Collect & Verify" to make a new determination. You can also update the "PEP and personal source of wealth".
4. Once all parties are updated and ticked, this section is completed automatically.
Related Article: If one of your CDD candidates is another entity (ie. a Company, Trust, Partnership or other) you may wish to also review our article Completing CDD across complicated ownership structures.
5. CDD Workflow Step: Source of Funds

Once the ‘Perform CDD’ section has been completed you can now move on to the ‘Source of funds’ section of the CDD form.
You can enter information and attach documents such as tax returns or sale and purchase agreements.
Click update once this section has been completed.
6. CDD Workflow Step: Risk Assessment

The ‘Risk assessment’ section contains a list of what is considered to be risky activities by the Department of Internal Affairs.
1. Select all activities which apply to this entity, or add your notes in the "other" field.
2. Under the checklist, there is a risk exposure dropdown. Having determined the areas of risk, assign an overall risk rating for this client.
-
Low
-
Medium
-
Medium-High
-
High
Click update once this section has been completed.
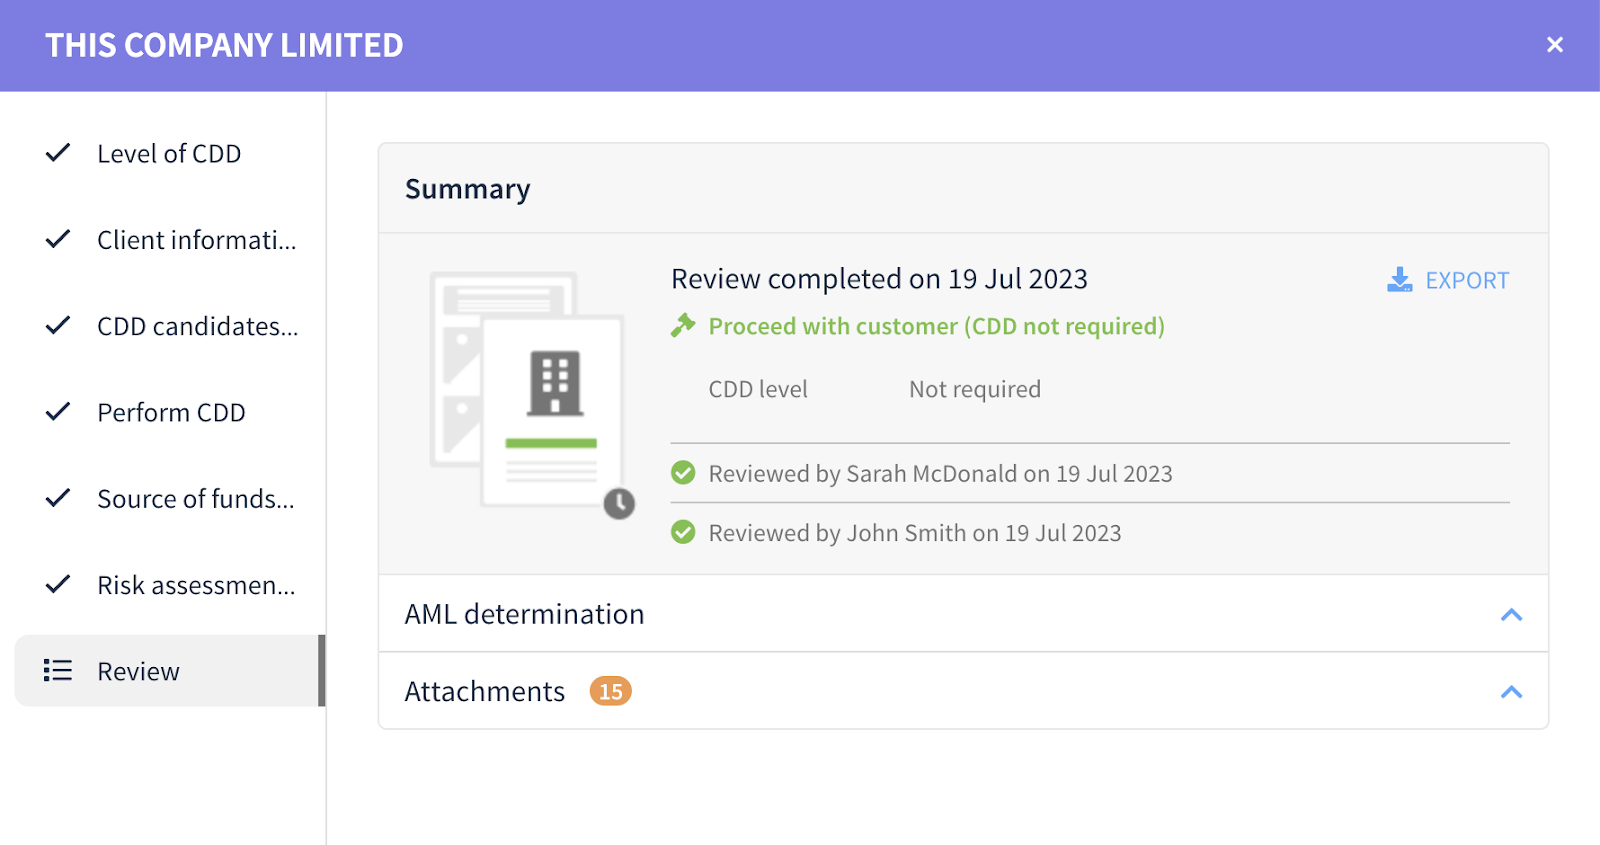
7. CDD Workflow Step: First & Second Review

The 'Review' section allows you to review all the activities recorded for the entity.
Summary
AML determination
The AML determination will give you an overview of the information entered into the workflow. The following areas are listed and the commentary is noted.
-
NAME
-
TYPE OF ENTITY
-
INCORPORATION
-
ADDRESS
-
LEVEL OF CDD
-
RELATIONSHIP
-
SOURCE OF FUNDS
-
LEVEL OF RISK
- IDENTIFIED RISKS
Any sections not completed will appear with a warning advising it is not yet recorded/determined.
CDD candidates and identities
All of the parties associated with the workflow and their documents are listed in CDD candidates and identities. Each party is separate and the ID evidence shows all the documents used to make the determination.
-
Name of entity (Person, Trust or Company)
-
Role(s) within the entity
-
AUTHORITY TO ACT
-
QUALIFIERS
-
RELATIONSHIP
-
PEP STATUS
-
DATE OF BIRTH
-
ADDRESS
-
ID EVIDENCE
Any sections not completed will appear with a warning advising it is not yet recorded/determined.
Documents
All documents are listed and can be previewed, download one of the documents, or all documents can be downloaded.
Overall CDD recommendation
There is a ‘Final determination’ section, here you can select ‘Proceed with client’ which will put the CDD into the "first review" workflow stage, an initial signoff is required before being assessed by your firm's AML Compliance Officer.
Perform the next review in
-
The default period (3yrs)
-
Six months
-
One year
-
Two years
-
Three years
-
Five years
-
Custom period
If you select 'Do not proceed' the review period is greyed out.
Click update once this section has been completed.
AML Workflow Status: First Review and confirmation
The First Review step in the workflow allows a client manager, firm manager, or Partner to review and approve the information that has been captured up until this point, this is typically done by the person who enters the information.
If you are satisfied with the summary then simply select the tick box "I have reviewed and confirmed CDD on this client" and then select Submit confirmation.
NB. If more information is required the reviewing manager can navigate back to the appropriate section of the workflow and add or amend the information, then proceed with the confirmation.
AML Workflow Status: Second Review
The second review is for your AML Compliance Officer to make a final confirmation that the CDD has been completed.
Just like the first review, your firm should have an internal process to advise the AML Compliance Officer when there are entities to be checked.
Once the second review has been completed, the entity will then be moved into the Completed CDD tab (at the top) and the entity's next scheduled review date is displayed next to it.
If for any reason you need to update CDD on a client in the Completed CDD tab you can do this by selecting the tick box by the entity name, then using the "..." drop-down menu to select "CDD needs updating", then return to the undergoing CDD tab and update as required.
Download a PDF of the completed AML record for clients
To help meet AML reporting requirements, a downloadable PDF is now available for every completed AML/CDD. The PDF contains a summary of all the decisions and activities that happened in the workflow.
Navigate to the Review tab of a completed CDD workflow and click “Export”.