When Company profiles are imported from the New Zealand Companies Office, Connectworks checks if the person is in the Clients>Contacts list. If the name and address match, the parties will be merged. If the address does not match, it creates a new profile.
The following 4-minute webinar will give you a breakdown of the merging process for duplicate contacts.
Contents
- 0:00 Merging existing contacts when multiple contacts have identity verifications completed
- 1:50 Importing a new Company once merging is completed.
- 3:00 Why parties with similar addresses are not merged.
Additional duplicates of a contact may appear due to being part of a trust or holding roles in multiple organisations.
It's critical to ensure that only one copy of each person is on your contacts list. It is essential to merge rather than delete these duplications to record all their roles in a single profile. There are many reasons that this is important, such as:
-
It maintains accurate oversight over a client's roles across multiple entities.
-
Preventing client due diligence and identity checks from being performed on the same individual more than once, potentially incurring unnecessary fees.
-
Ensuring the client is not given multiple Connectworks accounts.
-
Ensuring that a contact's personal information (such as phone number or address) is updated will update the details held in all the associated entities.
Merging Contacts After Importing Companies or Setting Up Trusts
Following importing a Company, setting up a Trust, or using our bulk import service, you will need to merge the duplicate contacts that have been created.
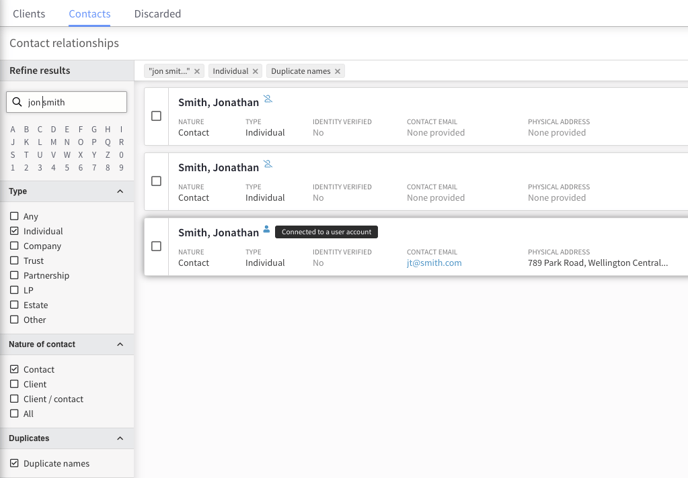
1. From your firm workspace navigate to Clients>Contacts.
2. On the left-hand side ensure the following filters are selected:
-
-
Type = Individual
-
Nature of contact = Client / Contact
- Duplicates = Duplicate names
-
It is recommended that all parties be merged in this selection.
3. Things to check before merging:
If your firm has been using Connectworks for client engagement you will need to check if the client has a Connectworks login account attached to any of the profiles. To do this:
-
Select the tick box next to the client's name. In the slide-out which appears check for the field "Connectworks -Yes, has a login account" or "Connectworks -No, has no account" (see screenshot below).
-
If any of the duplicate profiles show "Connectworks - Yes, has a login account" treat this profile as the Primary Contact, which will be selected first and all other duplicate profiles will be merged into.
-
If all duplicate profiles show "Connectworks -No, has no account", but one of the profiles has more complete information (such as stored documents, identity verification or Centrix check, or additional address/contact details) treat this profile as the Primary Contact, which which will be selected first.
-
If none of the above points applies you may select any of the profiles as the Primary Contact.
Check each duplicate profile to identify if there is a Primary Contact before proceeding with the next steps of the merging process.
If you identify there is a Primary Contact, this should always be the first profile selected using the tick box when merging.
4. Select the tick box of the profile you have identified as the Primary Contact, then select all other profiles for the client (up to a maximum of 9 profiles, plus the primary contact). A list will begin to appear in the slide-out menu.
5. When selecting all duplicate versions of the contact select "Merge" using the "..." menu.

After successfully merging all of the contact's profiles you will see a full list of the contact's associated entities, and their roles within them, appearing under the "Related Associations" field of the slide-out.
You can generate a .pdf report listing the client's roles using the "..." menu's "Export Summary" option - this can help create Directors Interests Registers.