This article will guide you through the start-to-finish process of importing a trust from XPM
-
0:00 Things to prepare before setting up a trust
-
1:37 Set up the Trust Profile
- 3:35 Updating associated parties within entity profiles (Individuals)
-
7:00 Updating associated parties within entity profiles (Companies)
-
10:16 Upload Historical Documents
After setting up the add-on, to import a trust:
NOTE: The trust deed is required to import a trust from XPM.
(During the XPM import process, you are required to enter the Trust's Settlement date - this becomes the default appointment date for all* Trustees and Beneficiaries.
*If an appointment date is set in XPM, this is applied against the trustee or beneficiary.
In Clients, All select the "I would like to..." menu at the top right of the page and then "Add a new entity". In Clients, Trust the option is "Add a Trust"
1. Search or Create
Import from another system
Here you can search the registry of XPM by typing in the Trust name.
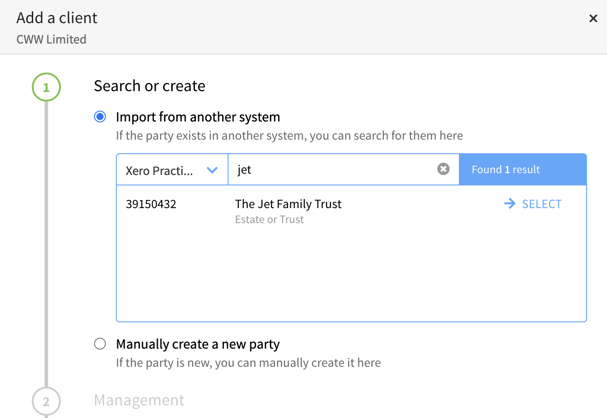
When the Trust appears in the list, click the ‘Select’ button.
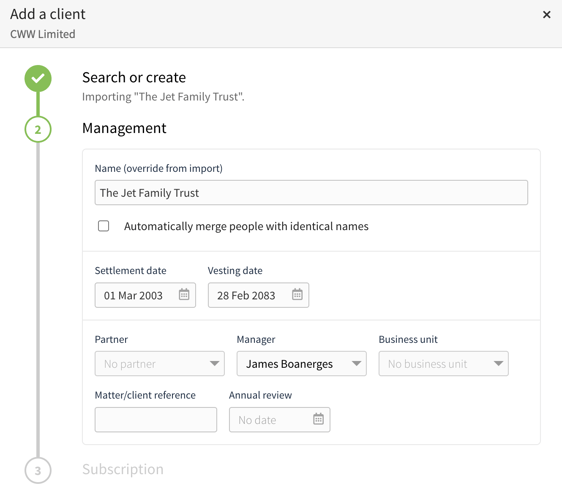
2. Management
In the Management section, you can do the following
-
Update Name (override from import)
-
Settlement and Vesting date (See notes above)
-
Set Partner, Manager or Business Unit
-
Matter/client reference
-
Annual review date
3. Subscription
Select the appropriate plan, depending on the entity that is added are the plans available. If unsure please see our article on Trust Subscription Plans & Pricing.
To activate the plan immediately select the tick box Apply plan immediately (no loading grace).
Select +Add or +Add and edit* to complete adding the Trust.
Update the main dashboard
To update the trust's main dashboard page, click Edit trust profile in the top right corner. This is where you can complete details such as:
-
AGM Date
-
Gifting Date
- Lifecycle (Setup status)
-
Notes on terms of trust
-
Power to vary trust deed
-
GST / IRD number etc.
See more information:
Update associated parties
During the XPM import process, you were required to enter the trust settlement date - this becomes the default appointment date for all* trustees and beneficiaries.
*If an appointment date is set in XPM, this is applied against the trustee and beneficiary.
In most instances this appointment date is correct, however, if there is a deed of appointment/removal then you will need to apply these changes manually. You may also be required to add retirement dates for any historic trustees.
For natural-born persons see:
For corporate trustee companies:
With Corporate Trustee Companies, there are several things to consider:
1. Is it a historical corporate trustee company?
If so simply select the appointment and retirement dates for the company to record when it was a trustee in the trust, as per:
With all historical companies, there is no need to import the Company from the Companies Office.
2. Is it an active corporate trustee company?
Corporate trustee companies are free subscriptions when they are linked to a trust in Connectworks. Importing the company profile from the Companies Office will bring through the director & shareholder information you will require for distributing documents for signing, as well as for completing AML compliance.
Follow the instructions below to import the company into your profile and connect it to the trust:
Once the Company is imported into Connectworks, then update the trustee appointment date, removing the Company that was imported from XPM.
Upload historical documents
Document management in Connectworks is covered extensively in our training module Document Management Webinar - we recommend all users watch this 15min video and download the associated workbook.
-
The trust deed
-
Variations to the deed
-
Deeds of appointment/removal
-
All historical trust documents (if building a complete record)
Documents correctly tagged with "Trust Deed or Variation" and "Trustee Appointment or Removal" appear on the Workspace tab.
